command check port process
March 29th, 2023netstat
netstat -anp tcp | grep "8080"Output

หรือ command บน macbook
lsof
lsof -i -P | grep LISTEN | grep 8080Output

netstat
netstat -anp tcp | grep "8080"Output
หรือ command บน macbook
lsof
lsof -i -P | grep LISTEN | grep 8080Output
เมื่อใช้ spring boot 2.5.x และใช้ spring cloud bud แล้วเจอปัญหานี้ “discovery client not initialized status unknown”
1 | springboot 2.5.x |
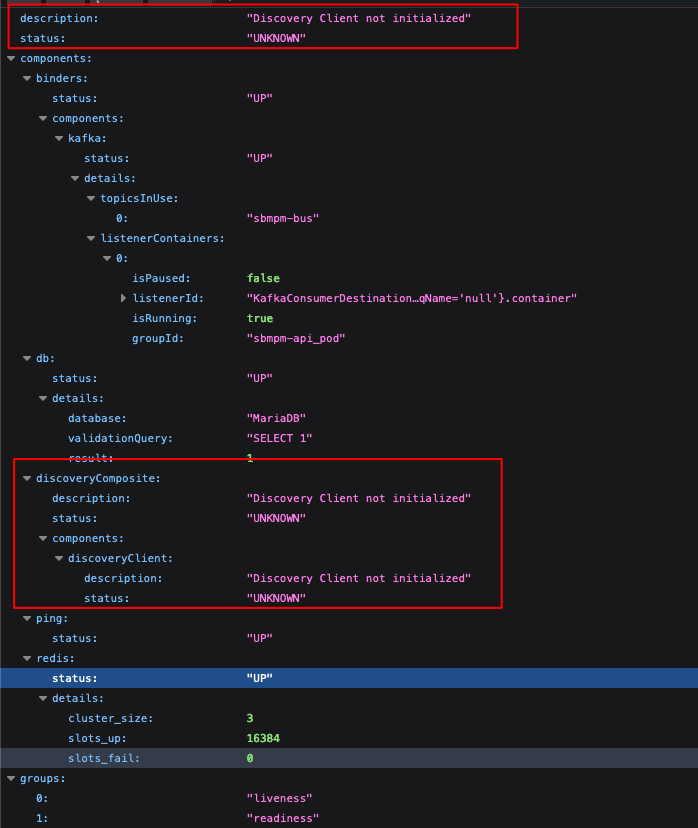
วิธีแก้เพิ่ม config anotation @Configuration นี้เข้าไป
1 2 3 4 5 6 7 8 9 10 11 12 13 14 15 16 17 18 19 20 21 22 23 24 | import org.springframework.cloud.client.discovery.event.InstanceRegisteredEvent; import org.springframework.context.ApplicationEventPublisher; import org.springframework.context.annotation.Configuration; import javax.annotation.PostConstruct; @Configuration public class DiscoveryCompositeConfig { private final ApplicationEventPublisher applicationEventPublisher; public DiscoveryCompositeConfig(ApplicationEventPublisher applicationEventPublisher) { this.applicationEventPublisher = applicationEventPublisher; } @PostConstruct public void postConstruct() { publishCustomEvent("Instance register event triggered"); } public void publishCustomEvent(final String message) { final InstanceRegisteredEvent<?> instanceRegisteredEvent = new InstanceRegisteredEvent<>(this, message); applicationEventPublisher.publishEvent(instanceRegisteredEvent); } } |
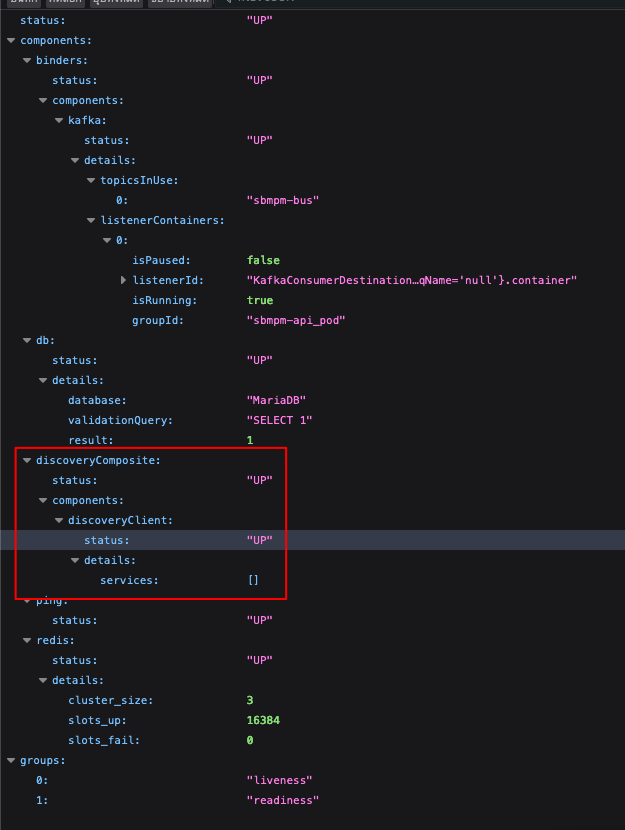
ผลที่ได้ กลายเป็น UP แล้ว
สำหรับใครหาวิธีแก้ ก็ลองเอาไปใช้ดู เผื่อใช้ได้
Dependency ที่ใช้
1 2 3 4 5 6 7 8 9 10 11 12 13 14 15 16 17 18 19 20 21 22 23 24 25 26 | <dependencyManagement> <dependencies> <dependency> <groupId>org.springframework.cloud</groupId> <artifactId>spring-cloud-dependencies</artifactId> <version>2020.0.3</version> <type>pom</type> <scope>import</scope> </dependency> </dependencies> </dependencyManagement> <dependencies> <dependency> <groupId>org.springframework.cloud</groupId> <artifactId>spring-cloud-starter-bus-kafka</artifactId> </dependency> <dependency> <groupId>org.springframework.boot</groupId> <artifactId>spring-boot-starter-actuator</artifactId> <optional>true</optional> </dependency> </dependencies> |
Step install podman on wsl2
1 2 3 | $ $ cat /etc/lsb-release $ |
DISTRIB_ID=Ubuntu
DISTRIB_RELEASE=18.04
DISTRIB_CODENAME=bionic
DISTRIB_DESCRIPTION=”Ubuntu 18.04.5 LTS”
=> DISTRIB_RELEASE is VERSION_ID
2. Run add sources list
1 2 3 | $ $ echo "deb https://download.opensuse.org/repositories/devel:/kubic:/libcontainers:/stable/xUbuntu_${VERSION_ID}/ /" | sudo tee /etc/apt/sources.list.d/devel:kubic:libcontainers:stable.list $ |
3. Run apt-key
1 2 3 | $ $ curl -L https://download.opensuse.org/repositories/devel:/kubic:/libcontainers:/stable/xUbuntu_18.04/Release.key | sudo apt-key add - $ |
4. Run update and upgrade
1 2 3 | $ $ sudo apt-get update && sudo apt-get -y upgrade $ |
5. Install podman
1 2 3 | $ $ sudo apt-get -y install podman $ |
Exanple command
Check version
1 2 3 | $ $ podman version $ |
Version: 3.0.1
API Version: 3.0.0
Go Version: go1.15.2
Built: Thu Jan 1 07:00:00 1970
OS/Arch: linux/amd64
View images
1 2 3 | $ $ podman images list $ |
View container
1 2 3 | $ $ podman ps -a or podman container list $ |
Copyright © 2009 @abciloveu.com | All Rights Reserved
ติดต่อ admin@abciloveu.com
